

Edits have been made to this post; please see the bottom of the Wrap-up section for a changelog.
Brief Context
Hiya! It's always felt to me that Arma 3, despite its robust modding / content scene, is not very well documented and often requires lots of bumbling around in 5yr old incomplete forum threads in order to learn anything.
So, I wanted to assemble a write-up of my respawn system all in one place! Even if your mission requires a slightly different configuration, I hope that this will be a good jumping-off point. Click here to skip to the main content! The resulting files / scripts can be found in the very last section in their entirety, so you can see how it all fits together.
DISCLAIMER: I am an intermediate noob when it comes to this stuff. I'll explain how I set my mission up, but I'm likely to make mistakes and your results may vary.
Further, this post assumes some foundational knowledge, such as:
- Some level of familiarity with navigating the editor and selecting / placing objects and modules,
- The concept of what a variable is, and a willingness to write/adapt some code that I will provide :)
- Optionally, understanding of what a Trigger is.
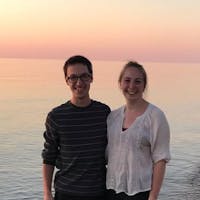
My custom mission/gamemode: "The Hunt"
In short, the mission I will be using as example here is called "The Hunt", the repo for which can be found here on my github. Full game info and rules can be found in the README.md.
Here is the mission description:
3-8ish players. An island off the SE coast of Malden. Opfor spawns ON the island with equipment favoring long-range engagements. Their mission is to eliminate Blufor, OR destroy both objective caches on the island. Blufor spawns just across the water on the mainland with equipment favoring short/medium-range engagements. Their mission is to eliminate Opfor, or defend the objectives for the specified period of time (currently 30 minutes).
After some playtesting early on, it became clear (through no small amount of crashing into rocks, bushes, getting ARMA'd only minutes after starting the mission) that in order to prevent players dying immediately and twiddling their thumbs for 30 minutes, there needed to be some sort of respawn mechanic. It also makes room for players to try high-risk / high-reward tactics.
After having just recently done some bugfixes, the following is my working solution to respawns.
Table of Contents
- Brief Context (above)
- Approach
- Multiplayer "Respawn" Settings
- Tickets
- Respawn Delay
- Spawn/Respawn Positions
- Loadouts
- Spectating
- Wrap-up
- Assembled Scripts
Specifications
- Each side should have a set number of respawn tickets.
- Each side should have its own respawn delay time. Opfor has shorter delay.
- At mission start, players should spawn at specific starting locations. After that, however, any re-spawns should take place at the side's designated respawn position.
- On respawn, players should be given one of the gamemode-specific loadouts. (NOT the default!)
- While waiting to respawn, players should spectate a teammate in 1st person only.
Approach
To begin, I'm using the Respawn module via 3den (Eden) editor (with tiny scripts as needed). This module can be found via the editor's "Assets > Systems (F5) > Multiplayer > Respawn Position". Once selected, you can click to place this module down where-ever you'd like the respawn position to be.
Note: It can be hard to tell the depth of the module icon in the Zeus editor. That is to say, double-check that your marker is not floating in the air or sunk into the ground by lowering the camera to ground-level and taking a look from that angle.
If the marker is accidentally set on a roof or in the ground, you can hold/drag the module with the mouse and adjust its height by HOLDING ALT while you drag it. The ALT key will constrain its movement to only the up/down axis.
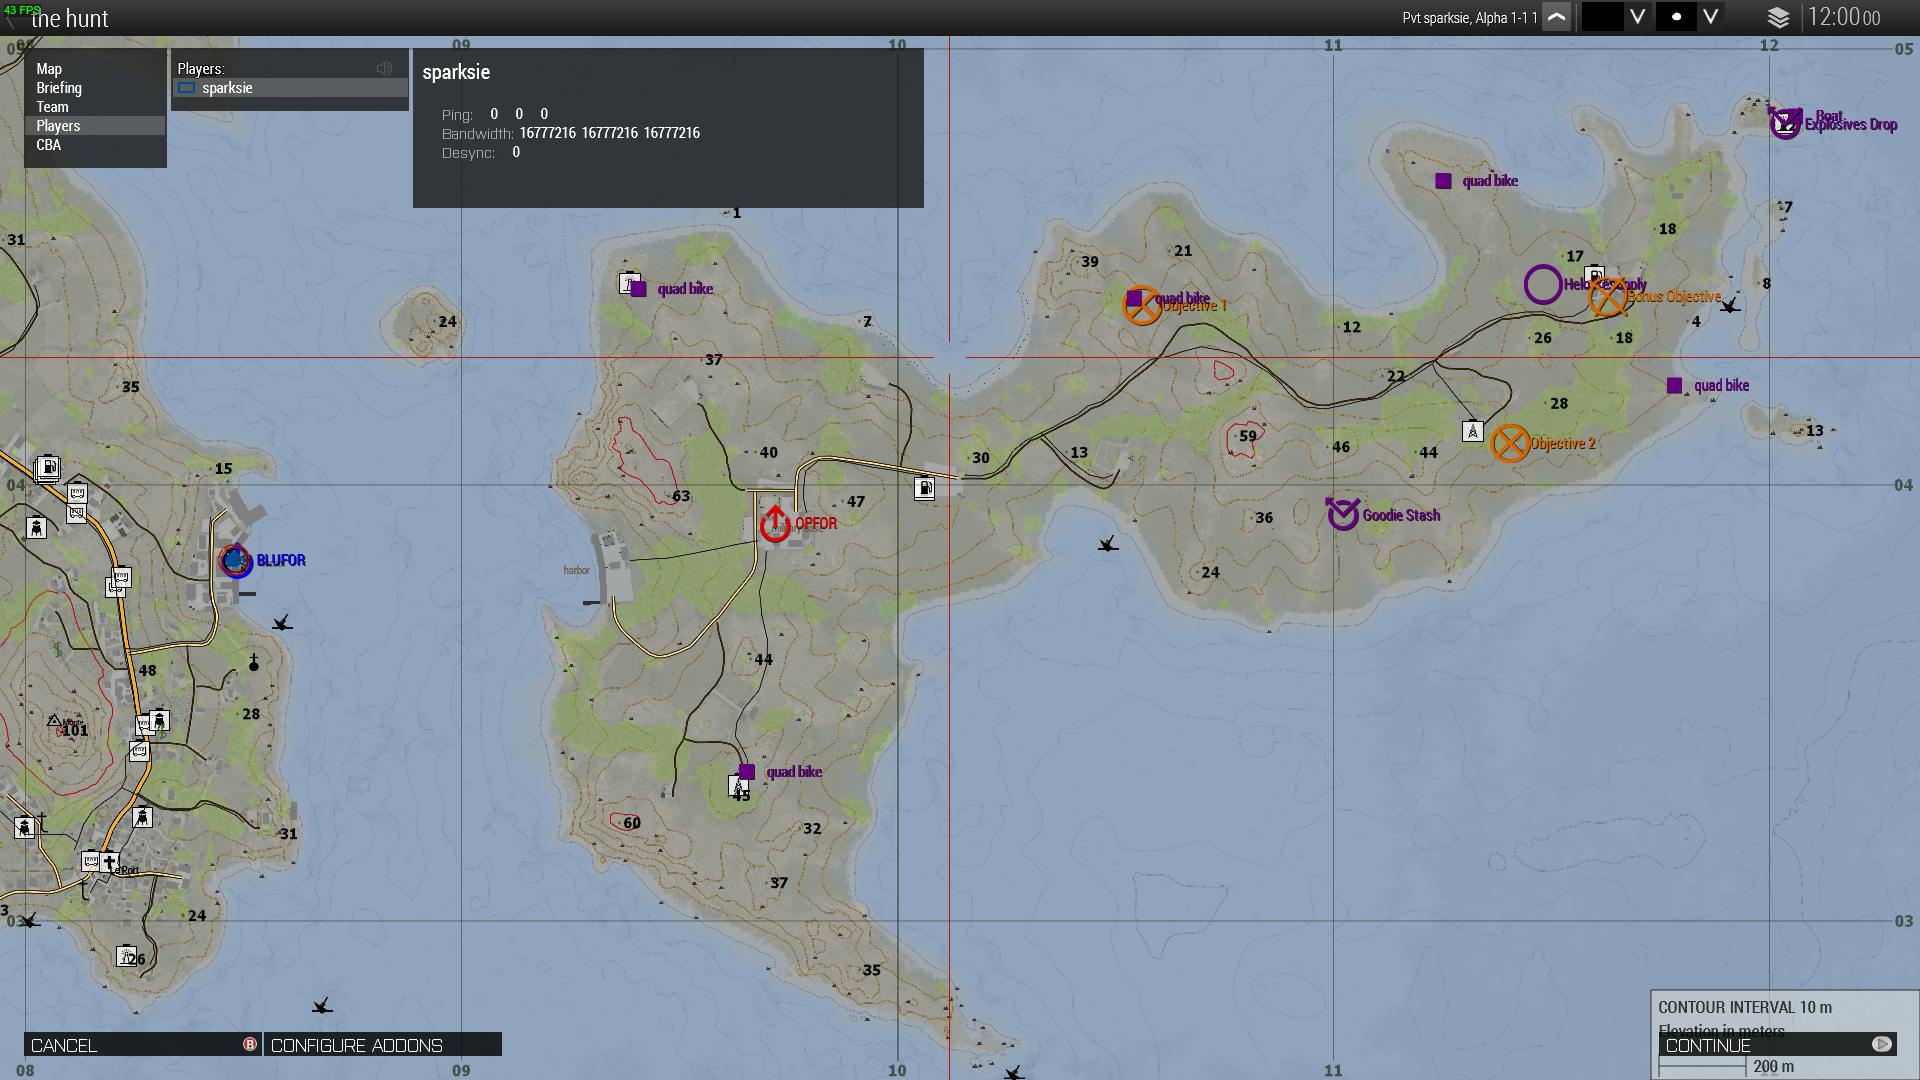
Double-click on the module marker (or Right-Click > Attributes) to open up the Attributes window for this module. In the "System: Init" tab, you'll want to give this position a variable name. This is how we will refer back to this point in the future to adjust it with code.
Also, set the drop-down box settings in the attributes window according to how you plan to use the point. For example, my Blufor respawn point looks like this:
Pay no mind to what I've entered in the "Name" box. I don't think I'm using that right.
Arma has a special convention for these respawn point names; the variable name must start with the following prefix, depending on which side it belongs to:
| Side | Name Prefix |
| Any side | respawn |
| Blufor | respawn_west |
| Opfor | respawn_east |
| Independent | respawn_guerila* |
| Civillian | respawn_civillian |
*"guerrilla" is misspelled, but that is the correct spelling according to ARMA.
This is a good time to mention: Arma refers to the "BLUFOR" side as "west", and the OPFOR side as "east". You'll see this a lot in the code snippets.
For example, one of my Blufor points is named respawn_west_4. ARMA 1) recognizes this as a Blufor spawnpoint, and 2) will tell players that it is called "4".
References:
- Describes how ARMA selects a spawnpoint for units / naming conventions
- Official BI reference for respawn
Multiplayer Respawn Settings
These can be found in the top bar of the editor, under the "Attributes > Multiplayer" tab.
First, under the "Respawn" tab, I've set the drop-down menu called "Respawn" to "Respawn on Custom Position".
Then, there are four "Rulesets" boxes to be checked:
- Select respawn position: This is one part of the solution needed to allow players selecting respawn loadouts.
- This will have ramifications later. See Spawn vs Respawn Positions.
- Select respawn loadout
- We will handle this further in Loadouts).
- Show respawn counter
- Subtract tickets upon respawn: It is my preference that the respawn tickets act as a resource to be traded for a new life. It's more intuitive to me that way.
- Spectator: I want dead players to spectate their teammates in 1st person, so we will need to enable this setting to allow that.
Tickets
In "Attributes > Multiplayer > Respawn" you can also set the number of respawn tickets that each side may have. I did this with code because I have future plans to accomodate; however, you can do it either way.
If you'd like to accomplish this via code, you can set the values fairly easily! In your mission directory (e.g. Documents/Arma 3/(arma3-profile-folder)/mpmissions/(mission-name)/), check to see whether there is a file called "initServer.sqf". If it is not present -- create it!
The game will automatically run this script when the missions starts on the server -- a perfect place for setting values for respawn tickets.
(You may need to do some fishing around to find your correct Arma profile folder. The setup can be strange.)
This can be done by making a new .txt file, and then renaming it / changing the file extension to be .sqf. If you cannot see the file extensions, make sure you've enabled the "File Name Extensions" checkbox in your File Explorer > View tab (Windows).
Most text editors should allow editing this file just like a .txt; if yours does not (i.e. regular Notepad.exe), you can either find a more robust text editor (like Notepad++), or change the extension to .txt, make your edits, and then change it back to .sqf.
NOTE: The initServer.sqf file will be executed between the mission lobby and the mission start.
For respawn tickets, the contents of initServer.sqf will look something like this:
// initServer.sqf

[west, 2] call BIS_fnc_respawnTickets; // BLUFOR
[east, 1] call BIS_fnc_respawnTickets; // OPFOR
The use of this function is just [side, #tickets] call BIS_fnc_respawnTickets;! Not too bad.
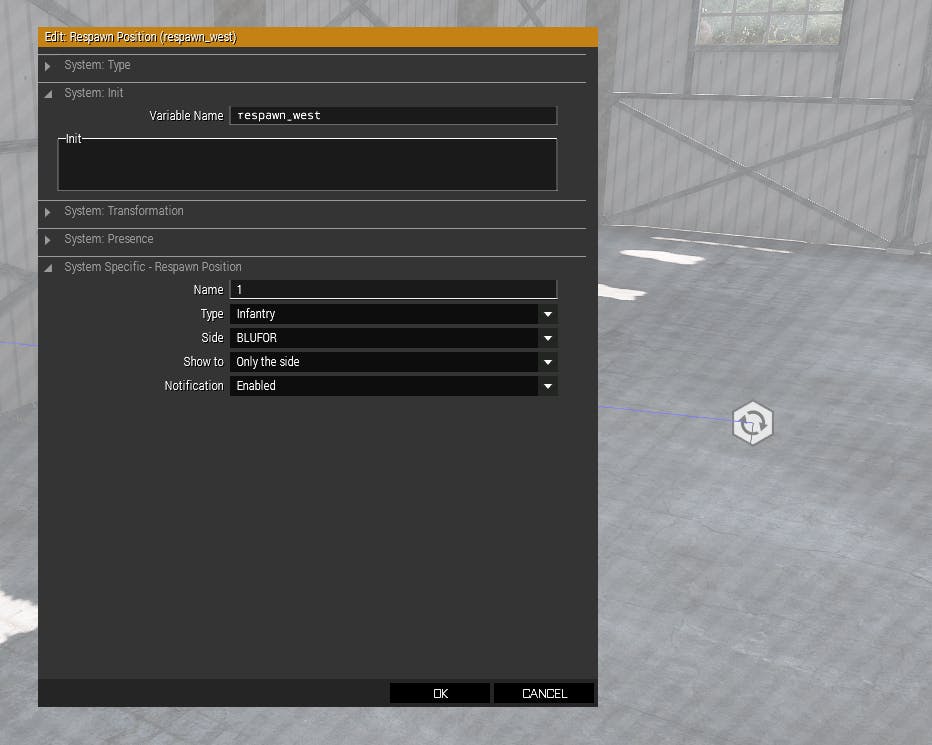
The
//double-slashes mean that anything written after them will be ignored by the game and not used as code. These are called "Comments"! They help humans leave notes for other humans, without disrupting the code.This function can also live in other places in the mission to accomplish different tasks. For example, you could set up a trigger somewhere in the mission to detect when a BLUFOR soldier makes it to a certain zone. When the trigger activates, this function can be used in the trigger body to reset the BLUFOR respawn ticket counter (i.e. a checkpoint).
Loadouts
Players are given very specific loadouts as a part of the balance of this gamemode, and we need to make sure that they also respawn with one of these loadouts; if we didn't set this up specifically, then players would simply be given the "Default" loadout defined by ARMA's config. We don't want that!
To deal with this, we'll need to add our own custom Role (CfgRoles) classes and Loadout (CfgRespawnInventory) classes to this mission's description.ext file.
Just like the initServer.sqf file -- if you have not already added a "description.ext" file to your mission directory, go ahead and do so!
"The description.ext is a mission config file and is used to set the overall mission attributes or to define global properties that will be available for other scripts" Reference
We'll be adding the two previously-mentioned classes to the file: CfgRoles and CfgRespawnInventory.
As a refresher to help understand how "Roles" and "Loadouts" are connected: Each role may have multiple associated loadouts. For example, a Marksman role might have options for either a medium-range loadout, or a longer-range loadout.
As a final disclaimer in this section, I'm not privy to any class naming conventions in the ARMA sphere. There's probably a "correct" way to name these things that I'm not aware of.
~CfgRoles~
For each role we'd like to create, we'll need just a couple of attributes; a displayName for the role, and an icon to be displayed along with it. Here's an example of some of my roles:
// in description.ext

class CfgRoles
{
    class BluClose // Close-range loadouts for BLUFOR
    {
        displayName = BluforClose;
        icon = "a3\Ui_f\data\GUI\Cfg\RespawnRoles\assault_ca.paa";
    };

    // ...

    class OpLight // Lightweight loadouts for OPFOR
    {
        displayName = OpforLight;
        icon = "a3\Ui_f\data\GUI\Cfg\RespawnRoles\assault_ca.paa";
    };
};
I personally wasn't concerned with the icons, so I left them as the default one. I haven't found very clear instructions anywhere on how to create custom icons, so I haven't dabbled in that at all.
As a reminder, the displayName attribute is what players will eventually see as the name of the loadout in the respawn screen.
~CfgRespawnInventory~
This config class actually defines the items/equipment that will be given to the player as part of the loadout. First, I'll show you a trick for setting up a soldier in the editor how you like, and exporting that loadout as a config class! In my opinion, this is way easier than manually finding and typing all of the item names.
This does require the use of a mod on the Steam Workshop: 3den Enhanced. It adds significant quality-of-life improvements and additional tools in the editor; if you're creating missions or using the editor, I highly recommend it.
Be sure to enable the mod in the Arma launcher after downloading!
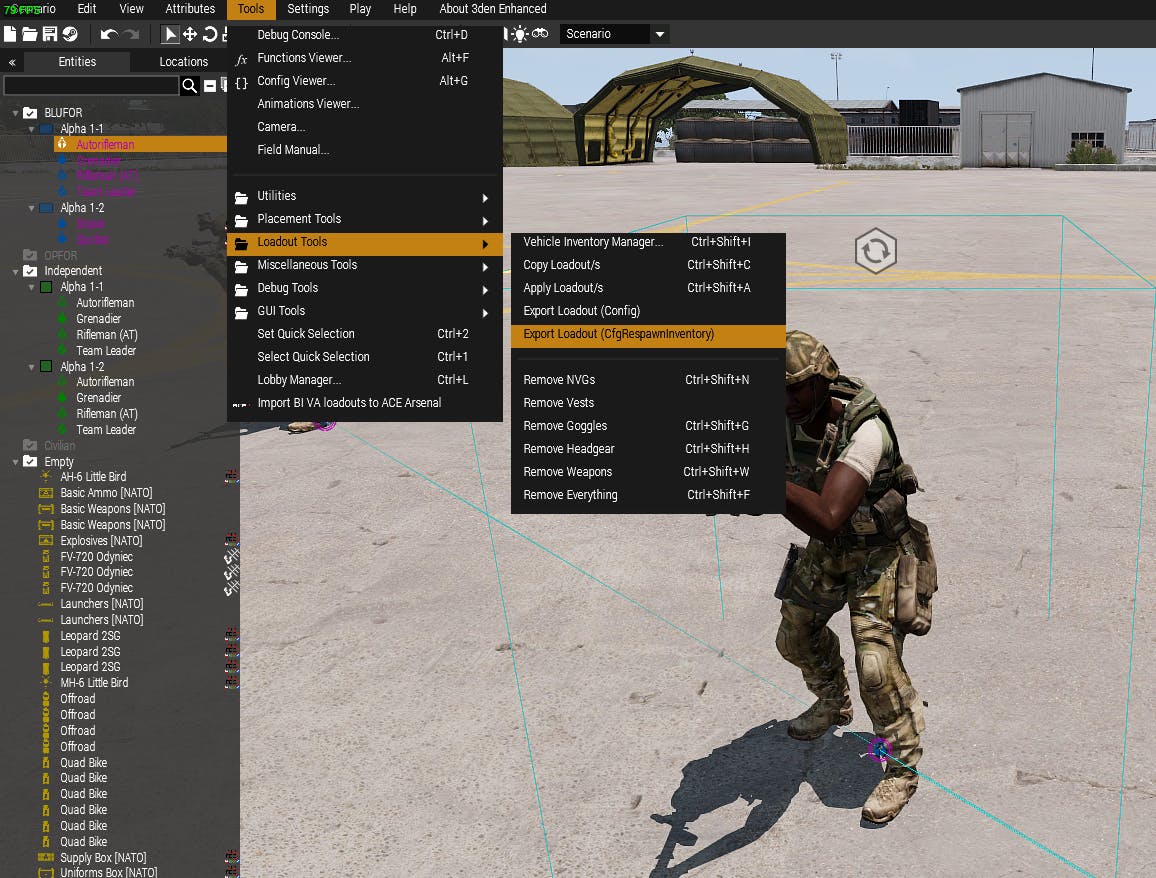
Now, we can quickly equip and export a loadout config like so:
- In the editor, create a unit to outfit
- Select them, right-click > Edit Loadout
- Equip them as you like
- In the top menu bar, select Tools > Loadout Tools > Export Loadout (CfgRespawnInventory)
- This will copy the loadout config to your clipboard!
Now, you can go to your description.ext file and paste in that snippet.
Wrap that snippet in braces and name the class, like this:
class CfgRespawnInventory
{

    // START OF PASTE
    class B_soldier_AR_F
    {
      displayName = "Autorifleman";
      icon = "\A3\Ui_f\data\GUI\Cfg\Ranks\sergeant_gs.paa";
      role = "Default";
      show = "true";
      uniformClass = "U_B_CombatUniform_mcam_tshirt";
      backpack = "";
      weapons[] = {"arifle_MX_SW_F", "hgun_P07_F", "Throw", "Put"};
      magazines[] = {"SmokeShell", "HandGrenade", "SmokeShellGreen", "Chemlight_green", "100Rnd_65x39_caseless_mag", "100Rnd_65x39_caseless_mag", "100Rnd_65x39_caseless_mag", "100Rnd_65x39_caseless_mag", "100Rnd_65x39_caseless_mag", "16Rnd_9x21_Mag", "16Rnd_9x21_Mag", "Chemlight_green"};
      items[] = {"FirstAidKit"};
      linkedItems[] = {"V_PlateCarrier2_rgr", "H_HelmetB_grass", "", "ItemMap", "ItemCompass", "ItemWatch", "ItemRadio", "NVGoggles", "", "acc_pointer_IR", "", "bipod_01_F_snd", "", "", "", ""};
    };
    // END OF PASTE

};
And now we can adjust the classname, displayName, and associated role for this loadout. The role property is the important one here; role decides what Role will have access to this loadout.
So, if you previously named your custom role something like "Medic", you'll want to make sure you set role = "Medic"; here. Following my previous example (since I named the Role "BluClose", I would set role = "BlueClose"; ). Note that there are quotes around the role name.
And now, you can add multiple additional loadouts / roles by adding additional classes within the "CfgRoles" and "CfgRespawnInventory" sections in your description.ext.
~Tying it all together ~
Okay, one last thing. We have defined these roles and loadouts, but now we need to actually tell the game to use them. Thankfully, this is straightforward.
We'll need to call a function within our initServer.sqf file for each loadout. We will be using BIS_fnc_addRespawnInventory. The function may be used like this:
[side, "class_name"] call BIS_fnc_addRespawnInventory
The "class_name" bit here is the loadout's class name, wrapped in quotes. So, using the CfgRespawnInventory code block from before as example, I would invoke the function as:
[west, "B_soldier_AR_F"] call BIS_fnc_addRespawnInventory;
This function can also add limits to the amount of players that can be using the role; read more on that in the official docs here.
So now, we should have a line like that in our initServer.sqf for each loadout we want to add!
This was a longer section, so let me recap briefly. We should have:
- Added Roles via
class CfgRolesin our description.ext - Added Loadouts via
class CfgRespawnInventoryin our description.ext - Checked that each loadout has its
roleproperty pointed to the correct CfgRole. - Called
BIS_fnc_addRespawnInventoryin initServer.sqf for each new loadout that we've added.
Spawn vs Respawn Positions
This was one of the first of the more challenging problems to address. I want players to spawn on the set respawn points after they are killed, however, I don't want them spawning there at the very beginning of the mission.
IMPORTANT Note: You can actually just have players spawn on the spot where you've placed their units/characters in the editor. But I actually really liked having players start at the respawn screen, so I did a little extra work to accomodate that.
To have players spawn directly at the unit's position on mission start, add the line
respawnOnStart = -1;to your description.ext file (acceptable values are -1, 0, or 1. See here for info). This way, it won't put players into the respawn screen at the top of the mission!
For that reason, I created two new/extra "spawn" positions with the respawn module -- one per side, located on their starting spot. I would need to have these positions enabled at the mission start, and then at some later time, disable them and enable the new respawn points.
To do this, I'm using the function BIS_fnc_moduleRespawnPosition. Unfortunately, there's basically no documentation for its use; even the Bohemia info page for this function is empty. There is the entry in the editor's Function Viewer, but it's over my head in terms of my understanding.
This means that I can't offer any details about it... but I did get it working well enough for my purposes.
To simply toggle a Respawn Module on or off, use this:
[<module-name>, nil, <activated(bool)>] BIS_fnc_moduleRespawnPosition
That abbreviation
boolis short for "boolean"; a boolean is a technical term for "true/false".
This means that if you have a module called "respawn_east" and want to turn it off, you run the command:
[respawn_east, nil, false] call BIS_fnc_moduleRespawnPosition
Concise!
Okay, back to the actual task at hand!
I already had a trigger laying around which activates the mission's main objectives after five minutes into the game. For my purposes, this is an acceptable enough place to switch the respawns; it would probably be better practice to create its own trigger and more thoughtful activation conditions, but this will do for now to show the point.
In the trigger's "On Activation" body, I used the following code to disable the original spawnpoints:
[respawn_east_starting, nil, false] call BIS_fnc_moduleRespawnPosition; [respawn_west_starting, nil, false] call BIS_fnc_moduleRespawnPosition;
Remember, that you cannot use line-breaks in the trigger's fields.
Now, to enable the new respawn points, there are two options:
- Use the same method of putting code in the trigger body, or
- Right-click > Sync the trigger to the respawn module to show.
Either way will work! I would prefer to use code for the sake of keeping it all as uniform as possible.
Respawn Delay
This one was a little of a tougher one! To recap, I wanted the setup to be like so:
- Blufor spawn delay should be about twice as long as Opfor spawn delay
- This difference in spawn times means we'll need to set the timers via script.
- Players should always spawn via the respawn screen, including at the very start of the mission
- (This is because I liked having players choose their loadouts this way instead of via the mission lobby)
Firstly, setting a player's respawn timer is fairly straightforward, using the command setPlayerRespawnTime <seconds>. We just need to know when and where to use it!
There are "events" that take place in the course of the mission, and when these events occur, their associated scripts will be run. For example, we're going to be adding some code to the script called "onPlayerRespawn.sqf". As you might guess, this script is executed any time that a player respawns during the mission (when they are alive again).
Just like initServer.sqf and description.ext, we can add our own onPlayerRespawn.sqf file into the mission folder, and the game will run this code at the appropriate times!
It turns out that checking a player's team is fairly easy as well. Within the script onPlayerRespawn.sqf, we can refer to the variable playerSide and check whether it is equal to east or west -- and then set the respawn timer accordingly. For example:
// onPlayerRespawn.sqf

if (playerSide == west) {
    setPlayerRespawnTime 300;
};

if (playerSide == east) {
    setPlayerRespawnTime 150;
};
Note for new coders: This is called an "If-Statement"! If the condition inside of the parentheses is true (if the player is whatever-side), then the game will run the code inside of the curly brackets. If the condition is false, the game will skip to the next line of code after the if-statement.
Also note the
==! This compares two values (which we want), while=assigns values (not what we want here).
Now when a player respawns, their delay timer will be set to the correct amount! Next we just need to handle the initial setting for that timer; before they "respawn" for the first time (inital spawn). This is a simple assignment in description.ext:
// description.ext

respawnDelay = 15;
This means that players will have a short 15-second delay to spawn for the first time, and as soon as they do, the timer will be set to the longer amount.
If we didn't handle that initial setting of respawnDelay, the game would make players wait for the full delay time of 150 or 300 seconds before they were able to spawn for the first time!
Spectating
To ensure I get the particular behavior that I want, I will be using a function to control the spectator. The indended behavior is that any fallen players should be able to spectate, but only their teammates, and only in 1st-person mode.
I'll be using the function BIS_fnc_EGSpectator, because its parameters offer the ability to dictate exactly what the spectator can do. There are many parameters, so I'll link the documentation page here so that you can take a look at them.
In my case, I'm using this function in two places:
- When the player is killed, in a script called "onPlayerKilled.sqf" (works just like onPlayerRespawn.sqf!); this should put player in spectator mode.
- When the player respawns, in our onPlayerRespawn.sqf script; this will turn off the spectator mode.
// onPlayerKilled.sqf

["Initialize", [ player, [playerSide], true, false, false ]] call BIS_fnc_EGSpectator;
// onPlayerRespawn.sqf

["Terminate"] call BIS_fnc_EGSpectator;
Again, refer to the linked documentation page to see what all of those parameters mean! All-in-all, this restricts the spectator according to how I laid it out at the beginning of this section.
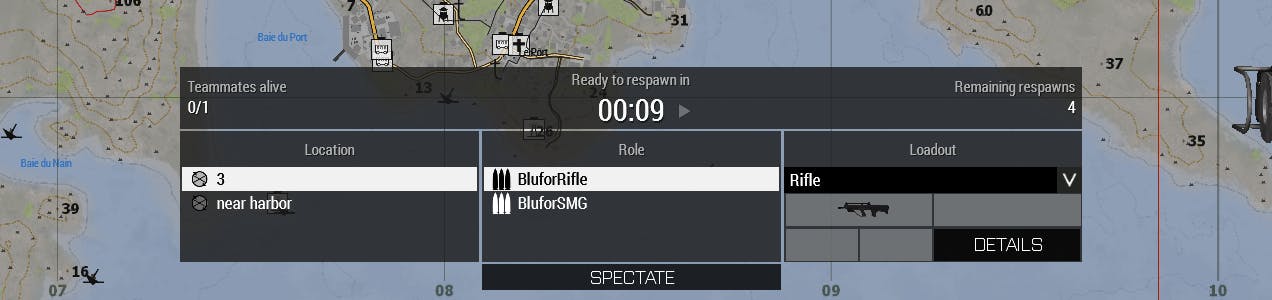
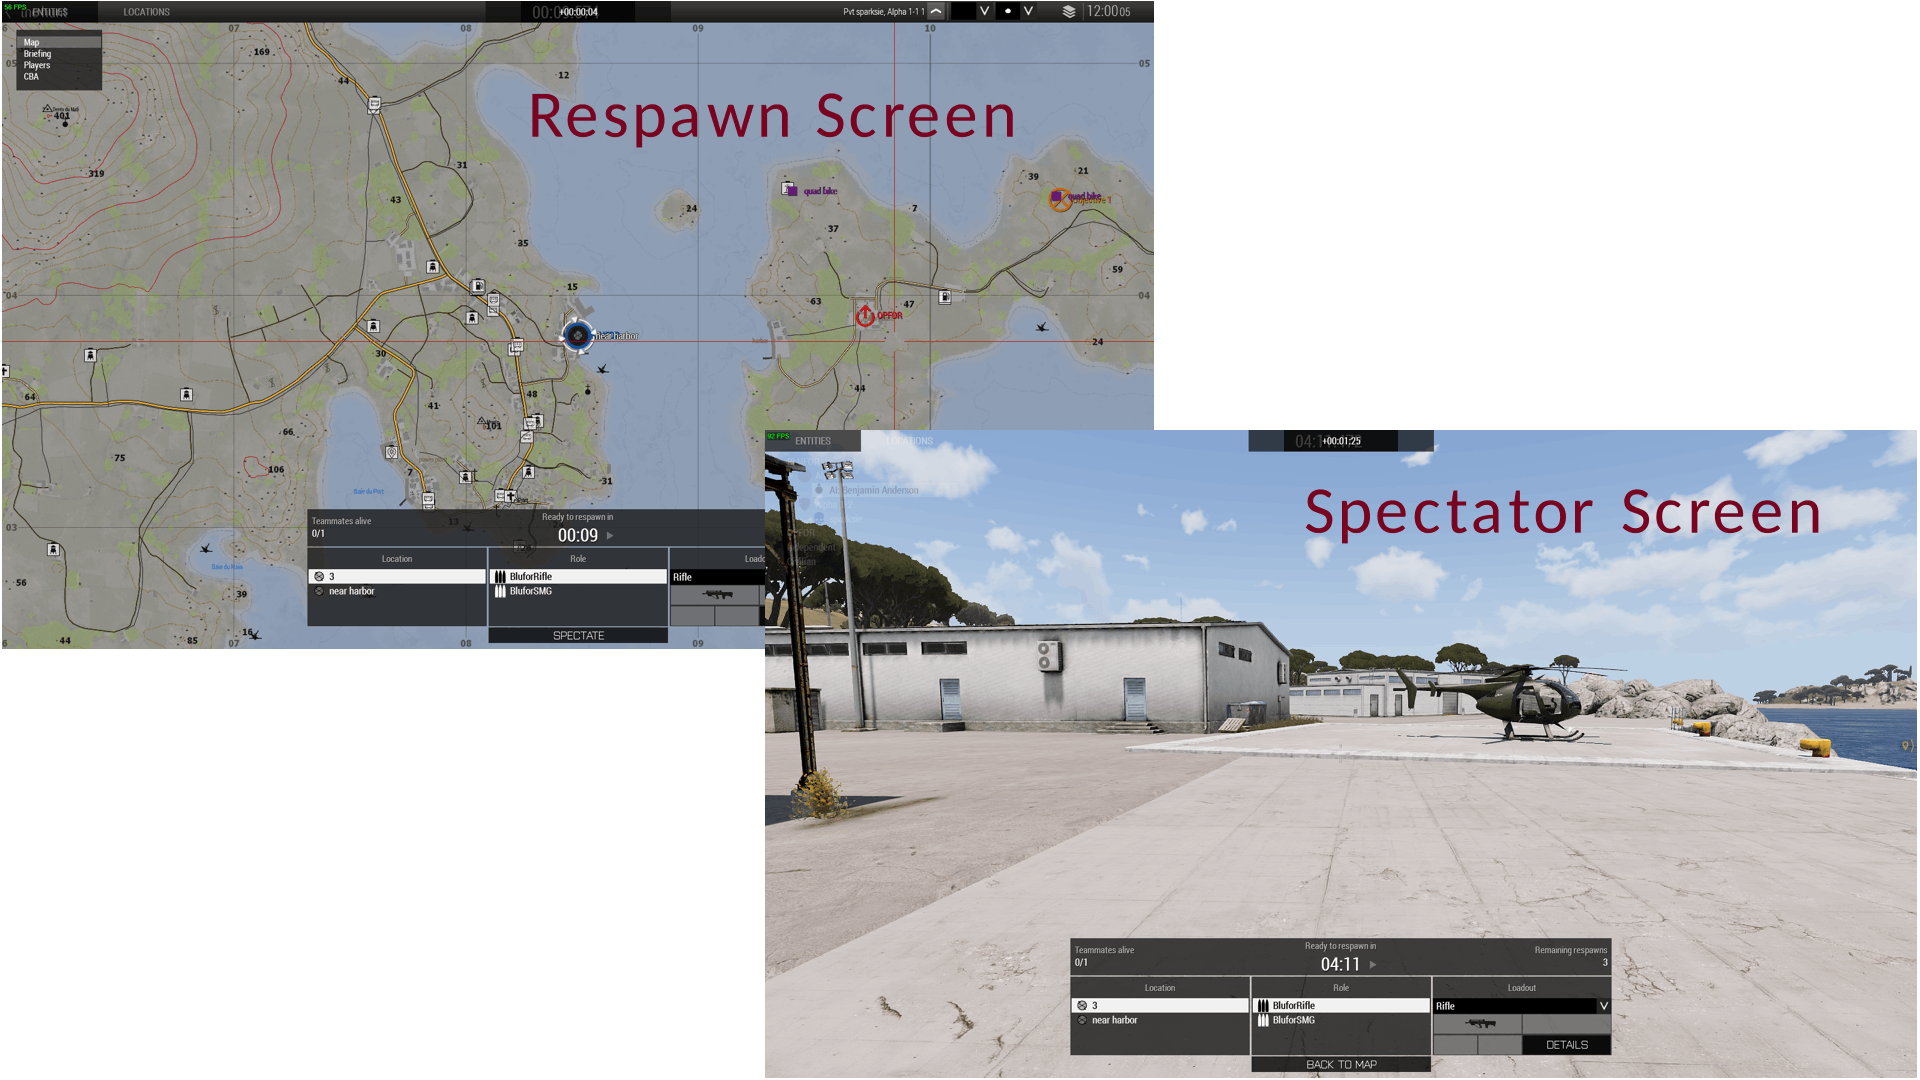
Note: Here is how the player will enter spectator mode in this method:
- Player falls
- Respawn screen appears
- Player clicks "Spectate" button at bottom
From here, the player will be able to Respawn after their delay is over.
Wrap-up
Okay, there we go! Hopefully you found use in this post.
If you have questions/comments about anything, OR if you found any mistakes (I probably made mistakes somewhere!), please feel free to contact me! You can do this here / in the comments, or on any listed social media platform.
I'll probably add a link here in the future to my personal website as well, which will include a contact form.
Cheers!
EDITS have been made to this post:
Note: An earlier version of this article included respawn-ticket code in a file called init.sqf. This is a problem, because of the fact that this script is executed at mission start for players who join-in-progress (JIP). This means that anytime a player joined, additional tickets would be added.
The code has been moved to a file called initServer.sqf, which is only executed when the mission starts on the server (once and only once).
Additionally, the post incorrectly stated that
respawnOnStartcould be set tofalse-- instead, it actually accepts the values -1, 0, or 1.*Thanks to a helpful reddit user on r/armadev for finding errors!
Assembled Scripts
// initServer.sqf

[west, 2] call BIS_fnc_respawnTickets;
[east, 1] call BIS_fnc_respawnTickets;

[west,"BluforRifle"] call BIS_fnc_addRespawnInventory;
[west,"BluforSMG"] call BIS_fnc_addRespawnInventory;
[east,"OpforShortRifle"] call BIS_fnc_addRespawnInventory;
[east,"OpforLongRifle"] call BIS_fnc_addRespawnInventory;
// onPlayerKilled.sqf

["Initialize", [ player, [playerSide], true, false, false ]] call BIS_fnc_EGSpectator;
// onPlayerRespawn.sqf

if (playerSide == west) then {
    setPlayerRespawnTime 300;
};

if (playerSide == east) then {
    setPlayerRespawnTime 150;
};

["Terminate"] call BIS_fnc_EGSpectator;
// description.ext

respawnDelay = 15;


// ROLES
class CfgRoles
{
    class BluRifle
    {
        displayName = BluforRifle;
        icon = "a3\Ui_f\data\GUI\Cfg\RespawnRoles\assault_ca.paa";
    };

    class OpShort
    {
        displayName = OpforSR;
        icon = "a3\Ui_f\data\GUI\Cfg\RespawnRoles\assault_ca.paa";
    };
};


// LOADOUTS
class CfgRespawnInventory
{
    class BluforRifle
    {
      displayName = "Rifle";
      icon = "\A3\Ui_f\data\GUI\Cfg\Ranks\sergeant_gs.paa";
      role = "BluRifle";
      show = "true";
      uniformClass = "U_B_CombatUniform_mcam";
      backpack = "";
      weapons[] = {"arifle_Katiba_C_F", "hgun_P07_F", "Binocular", "Throw", "Put"};
      magazines[] = {"SmokeShell", "SmokeShell", "HandGrenade", "HandGrenade", "16Rnd_9x21_Mag", "16Rnd_9x21_Mag", "30Rnd_65x39_caseless_green", "30Rnd_65x39_caseless_green"};
      items[] = {"ACE_DefusalKit", "ACE_adenosine", "ACE_fieldDressing", "ACE_fieldDressing", "ACE_fieldDressing", "ACE_packingBandage", "ACE_packingBandage", "ACE_packingBandage", "ACE_packingBandage", "ACE_packingBandage", "ACE_packingBandage", "ACE_quikclot", "ACE_quikclot", "ACE_quikclot", "ACE_quikclot", "ACE_quikclot", "ACE_quikclot", "ACE_EarPlugs", "ACE_epinephrine", "ACE_epinephrine", "ACE_morphine", "ACE_salineIV_500", "ACE_salineIV_500", "ACE_tourniquet", "ACE_tourniquet", "ACE_tourniquet", "ACE_tourniquet"};
      linkedItems[] = {"V_PlateCarrier1_rgr", "H_HelmetB", "G_Bandanna_oli", "ItemMap", "ItemCompass", "ItemWatch", "ItemRadio", "", "acc_pointer_IR", "optic_Aco", "", "", "", "", ""};
    };

    class OpforShortRifle
    {
      displayName = "ShortRifle";
      icon = "\A3\Ui_f\data\GUI\Cfg\Ranks\sergeant_gs.paa";
      role = "OpShort";
      show = "true";
      uniformClass = "U_O_CombatUniform_ocamo";
      backpack = "B_AssaultPack_mcamo";
      weapons[] = {"srifle_DMR_01_F", "hgun_Pistol_heavy_01_F", "Rangefinder", "Throw", "Put"};
      magazines[] = {"HandGrenade", "HandGrenade", "SmokeShell", "SmokeShell", "11Rnd_45ACP_Mag", "11Rnd_45ACP_Mag", "10Rnd_762x54_Mag", "10Rnd_762x54_Mag"};
      items[] = {"ACE_adenosine", "ACE_fieldDressing", "ACE_fieldDressing", "ACE_fieldDressing", "ACE_packingBandage", "ACE_packingBandage", "ACE_packingBandage", "ACE_packingBandage", "ACE_packingBandage", "ACE_packingBandage", "ACE_quikclot", "ACE_quikclot", "ACE_quikclot", "ACE_quikclot", "ACE_quikclot", "ACE_quikclot", "ACE_EarPlugs", "ACE_epinephrine", "ACE_epinephrine", "ACE_morphine", "ACE_salineIV_500", "ACE_salineIV_500", "ACE_tourniquet", "ACE_tourniquet", "ACE_tourniquet", "ACE_tourniquet"};
      linkedItems[] = {"V_TacVest_khk", "H_HelmetB_grass", "", "ItemMap", "ItemCompass", "ItemWatch", "ItemRadio", "", "", "optic_DMS", "", "", "", "", ""};
    };
};
// in a Trigger's On-Activation body
// to deactivate spawpoints and activate RE-spawn points

[respawn_east_starting, nil, false] call BIS_fnc_moduleRespawnPosition; [respawn_west_starting, nil, false] call BIS_fnc_moduleRespawnPosition;
[respawn_east_new, nil, true] call BIS_fnc_moduleRespawnPosition; [respawn_west_new, nil, true] call BIS_fnc_moduleRespawnPosition;